Object detection with a Yolov5 computer vision model in a .NET application
Introduction
In the previous post I showed how I trained a Yolov5 computer vision model to recognize Starfleet combadges, and how Yolo’s own command line tool can be used to recognize them in a video.
That is nice for testing the capabilities of the model, however has no practical use.
We can of course use ultralytics python library to use the model in a Python application, but there are times when we’d like to use it some other environment. Maybe we have a legacy application that we have to maintain, and we’d like to add object detection features to it. Whatever the reason fortunately there’s a solution.
This post will show how to do this in C# .NET with an example Windows Forms application.
The reason for this is because I had to create such an application for a course.
Exporting the model
First and foremost we need to export the model to a format that can be used in another environment.
Fortunately there’s an industry standard format for this: ONNX
which stands for Open Neural Network eXchange, and is supported by many libraries.
Yolo also comes with a built-in tool that can export our model in this format, with a simple command:
python export.py --weights D:\projects\python\yolov5\yolov5\runs\train\exp2\weights\best.pt --include onnxWe can visualize our exported ONNX with a web based tool at https://netron.app
Setting up the project
Our little example project is going to use .NET 6 as the dependencies require this.
Because of this and because of Windows Forms we need (or at least strongly suggested to use) Visual Studio 2022.
In the New Project dialog we need to select Windows Forms App (the one that does NOT say .NET framework), and select .NET 6 as a framework.
Installing dependencies
Next we’re going to install the libraries that we need.
The library we’re going to use the model with is Yolov5Net.
It is built on ML.NET which makes that a dependency too. It has a CPU and a GPU version, but we’re going to stick with the CPU version for this example.
Yolov5Net also depends on ImageSharp, and we’re going to use ImageSharp Draw to manipulate images.
Fortunately we can easily install all this with NuGet commands in the Package Manager Console ( Tools – NuGet Package Manager – Package Manager Console in VS2022 ).
Install-Package Yolov5Net -Version 1.1.0
Install-Package Microsoft.ML.OnnxRuntime -Version 1.14.1
Install-Package SixLabors.ImageSharp.Drawing -Version 2.1.2
Building the application
First we need to create a model definition record for our Yolo based model.
This record contains hyperparameters like the labels we use, the image size used by the model, etc.
For this we need to create a new record (it is named ComBadgeModel in my example app) that inherits from YoloModel base record.
If we used the default parameters for training and only changed the labels then
we can just copy YoloCocoP5Model and then just change these 3 parameters:
- dimensions
- labels
- output
The labels we defined before training the model.
The dimensions is exactly the number of labels + 5.
As for the name of the output we can get it by examining the model with the netron.app web based tool.
We also need a form, with a browse button and a PictureBox.
The browse button will trigger a file selection dialog where we can select the image file we’d like to recognize objects on.
The PictureBox will show this image with bounding boxes around the recognized objects.

In the form’s class we have some setting up to do:
Load a font that we want to use:
Font font = new Font(new FontCollection().Add("C:/Windows/Fonts/consola.ttf"), 12);Load our computer vision model:
YoloScorer scorer = new YoloScorer("best.onnx");Once this is done we implement the rest of the application logic in the click event handler of the browse button:
Get the filename from the user through a dialog:
OpenFileDialog ofd = new OpenFileDialog();ofd.Filter = "JPG (.JPG)|.jpg";
DialogResult result = ofd.ShowDialog();
if( result != DialogResult.OK )
{
return;
}
Then we can load the image:
Image img = await Image.LoadAsync(fileName);Once we have the image, we can detect objects on the loaded image:
List predictions = scorer.Predict(img);Then we can label the detected objects by drawing bounding boxes and drawing the label and the confidence value:
foreach (YoloPrediction prediction in predictions)
{
 double score = Math.Round(prediction.Score, 2);

 float x = prediction.Rectangle.Left - 3;
 float y = prediction.Rectangle.Top - 23;

 img.Mutate(a => a.DrawPolygon(
     new SolidPen(prediction.Label.Color, 1),
     new PointF(prediction.Rectangle.Left, prediction.Rectangle.Top),
     new PointF(prediction.Rectangle.Right, prediction.Rectangle.Top),
     new PointF(prediction.Rectangle.Right, prediction.Rectangle.Bottom),
     new PointF(prediction.Rectangle.Left, prediction.Rectangle.Bottom)
     )
 );

 img.Mutate(
    a => a.DrawText($"{prediction.Label.Name} ({score})",
    font, prediction.Label.Color, new PointF(x, y)));
}
Finally we need to display the labeled image in the PictureBox.
In order to do that we have to convert the ImageSharp Image to System.Drawing.Image.
For that we have to extend the ImageSharp image class with some extensions methods that can be found here and should be added to a static class.
Once this is done we can actually convert and display the image in the PictureBox:
pictureBox1.BackgroundImage = img.ToArray().ToDrawingImage();The result
The application will look something like this in action:

You can find a full example on Github.
Troubleshooting
If you get a System.InvalidOperationException: Sequence contains no matching element exception then you should check that your model parameters are correct.
Object detection on videos with computer vision using the YOLOv5 model
I’ve been quite interested in computer vision for some time, just never had the time for it.
Until now that is. Because now I have to deal with it for an AI course.
As a first project I’ve custom trained a (neural network) model based on yolov5s (s for small) to detect Starfleet communicator badges from the DS9, Voyager, and TNG films era.
Using a mere 16 training images that I found using google, and then annotated using labelimg:

I used the following command to train:
python train.py --epochs 300 --data D:\projects\python\yolov5\voycombadge\data.yaml --weights yolov5s.pt --cacheTraining the model took about 20 minutes on my Ryzen 5 2600, 32 GB RAM, Geforce GTX 1650 with CUDA support. It used up 10 GB of system RAM, and 4 GB of video RAM, and about 25% of GPU.
When the training finished I used the following command to detect the comm badges on the example video:
python detect.py --source "vid.avi" --weights D:\projects\python\yolov5\yolov5\runs\train\exp2\weights\best.pt --view-img --conf-thres 0.5The result can be seen here.
Pretty nice, isn’t it? 🙂
My next task will be to export the model and use it in a stand-alone application using a different language.
Arcemu on Linux on Raspberry Pi 4b
Like I promised in my previous post, I’ve tried to build and run Arcemu with Linux on my Raspberry device.
I had to switch to Armbian Jammy (Ubuntu based) from the Diet PI (Debian based) however since Diet Pi unfortunately doesn’t have libmysqlclient21 and I didn’t want to install it from other sources, to make things simple.
Either way, I’m happy to report that, just like I expected, I could build it and it works fine as it is clearly visible on the picture below

This verifies that Arcemu can build and run on a real Arm based device, not just on a qemu emulated one.
Arcemu on Windows for Arm on Raspberry Pi
Several posts ago I reported that Arcemu now supports the Arm platform on both Windows and Linux.
Then I didn’t have an actual Arm device so I could only work with qemu emulation.
Having bought a Raspberry Pi and installed Windows for Arm on it I could finally try and verify it.
I am happy to report that it works without a problem on both Windows 10 and Windows 11 for Arm.


Altough I expect the same results soon I’m going to verify on Linux as well. 🙂
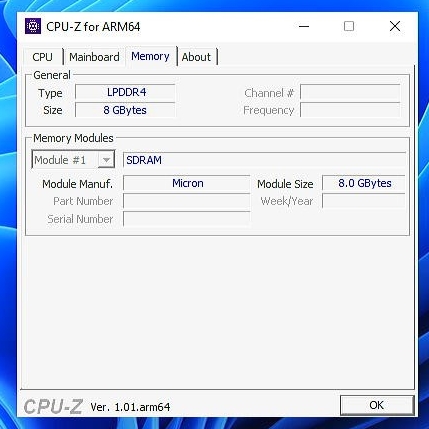
Cpu-Z for Windows on ARM64 on Raspberry Pi 4b
Some days ago the release of cpu-z for the ARM64 platform made headlines in tech news.
Out of curiosity I tried it on the Pi.
On Windows 10 it just didn’t work. It kept crashing on startup because of a perflib permissions issue.
However on Windows 11 it worked just fine, see the images:


Windows for ARM on my Raspberry PI 4b
In the previous post, I wrote that I wanted to get a Raspberry Pi 4b because I wanted to try Windows on it. It was only 2 days ago I finally made some time, and finally started tinkering with it.
Why would I want to do this?
Raspberry Pi is a fairly inexpensive Single Board Computer which makes it possible for me to test software especially software I develop on the Arm platform. Windows has support for Arm too and Raspberry is the cheapest solution to try it.
The installation process
My initial plan was to burn the Windows 10 for Arm ISO onto an SD Card, boot from it, and then install the system onto an USB flash drive.
That plan unfortunately failed, because Raspberry just wouldn’t boot from the SD Card.
Instead it was complaining that the card didn’t have a FAT filesystem.

Fortunately I found the Windows on Raspberry project! It provides a tool with a wizard, that can deploy Windows from an ISO or ESD image to an SD Card or USB drive.
This means that once you are done flashing the image you will not have to go through the entire Windows install process, only the last stage: personalizing the fresh Windows deployment.
Just like when you buy a computer with preinstalled Windows.
I could get both Windows 10 and Windows 11 to work using this tool.
You can find the Windows on Raspberry project’s official installation guide here.
The instructions there, and the wizard steps are fairly straightforward so I’m not going to cover the process in full detail.
Unfortunately the official guide doesn’t contain images about the wizard, but I can remedy that:


Observations and problems
Heating
Even with a heat sink and fans, like my setup on the picture below, Raspberry is going to be hot during installation and setup as Windows is going to make the CPU cores work a lot so don’t be surprised.

Stability
Windows on the Raspberry Pi can be quite unstable. So don’t be surprised about the ocassional system crash. I’m fairly sure it’s because of the drivers. There’s nothing you can do about it sadly.
Networking
Because of lack of drivers the Wi-Fi of the Pi will not work, so you will have to use the Ethernet port, or use an USB Wi-Fi adapter that Windows has drivers for.
However you should connect it only after finishing the installation (personalization) so that it doesn’t try to download updates during the process. It just slows it down. You can update later if you’d like.
Storage options
I used a 64 GB Samsung FIT plus flash drive, which is very small, thus doesn’t require much power AND fast. Perfect for such a use case. You should use something like this too.
Screen flickering
The screen can flicker on default settings when scrolling during the setup. I suspect this is because it doesn’t detect the screen properly.
You can remedy this by manually setting the HDMI mode in the boot options in the wizard.
For my 16:90 1920×1080@60hz display I entered these lines:
hdmi_group=2
hdmi_mode=2
For all the possible options see the official documentation of Raspberry Pi.
The results
After the installation if everything went right you can enjoy Windows on your Raspberry Pi.
Windows 10


Windows 11


Raspberry PI 4 model B
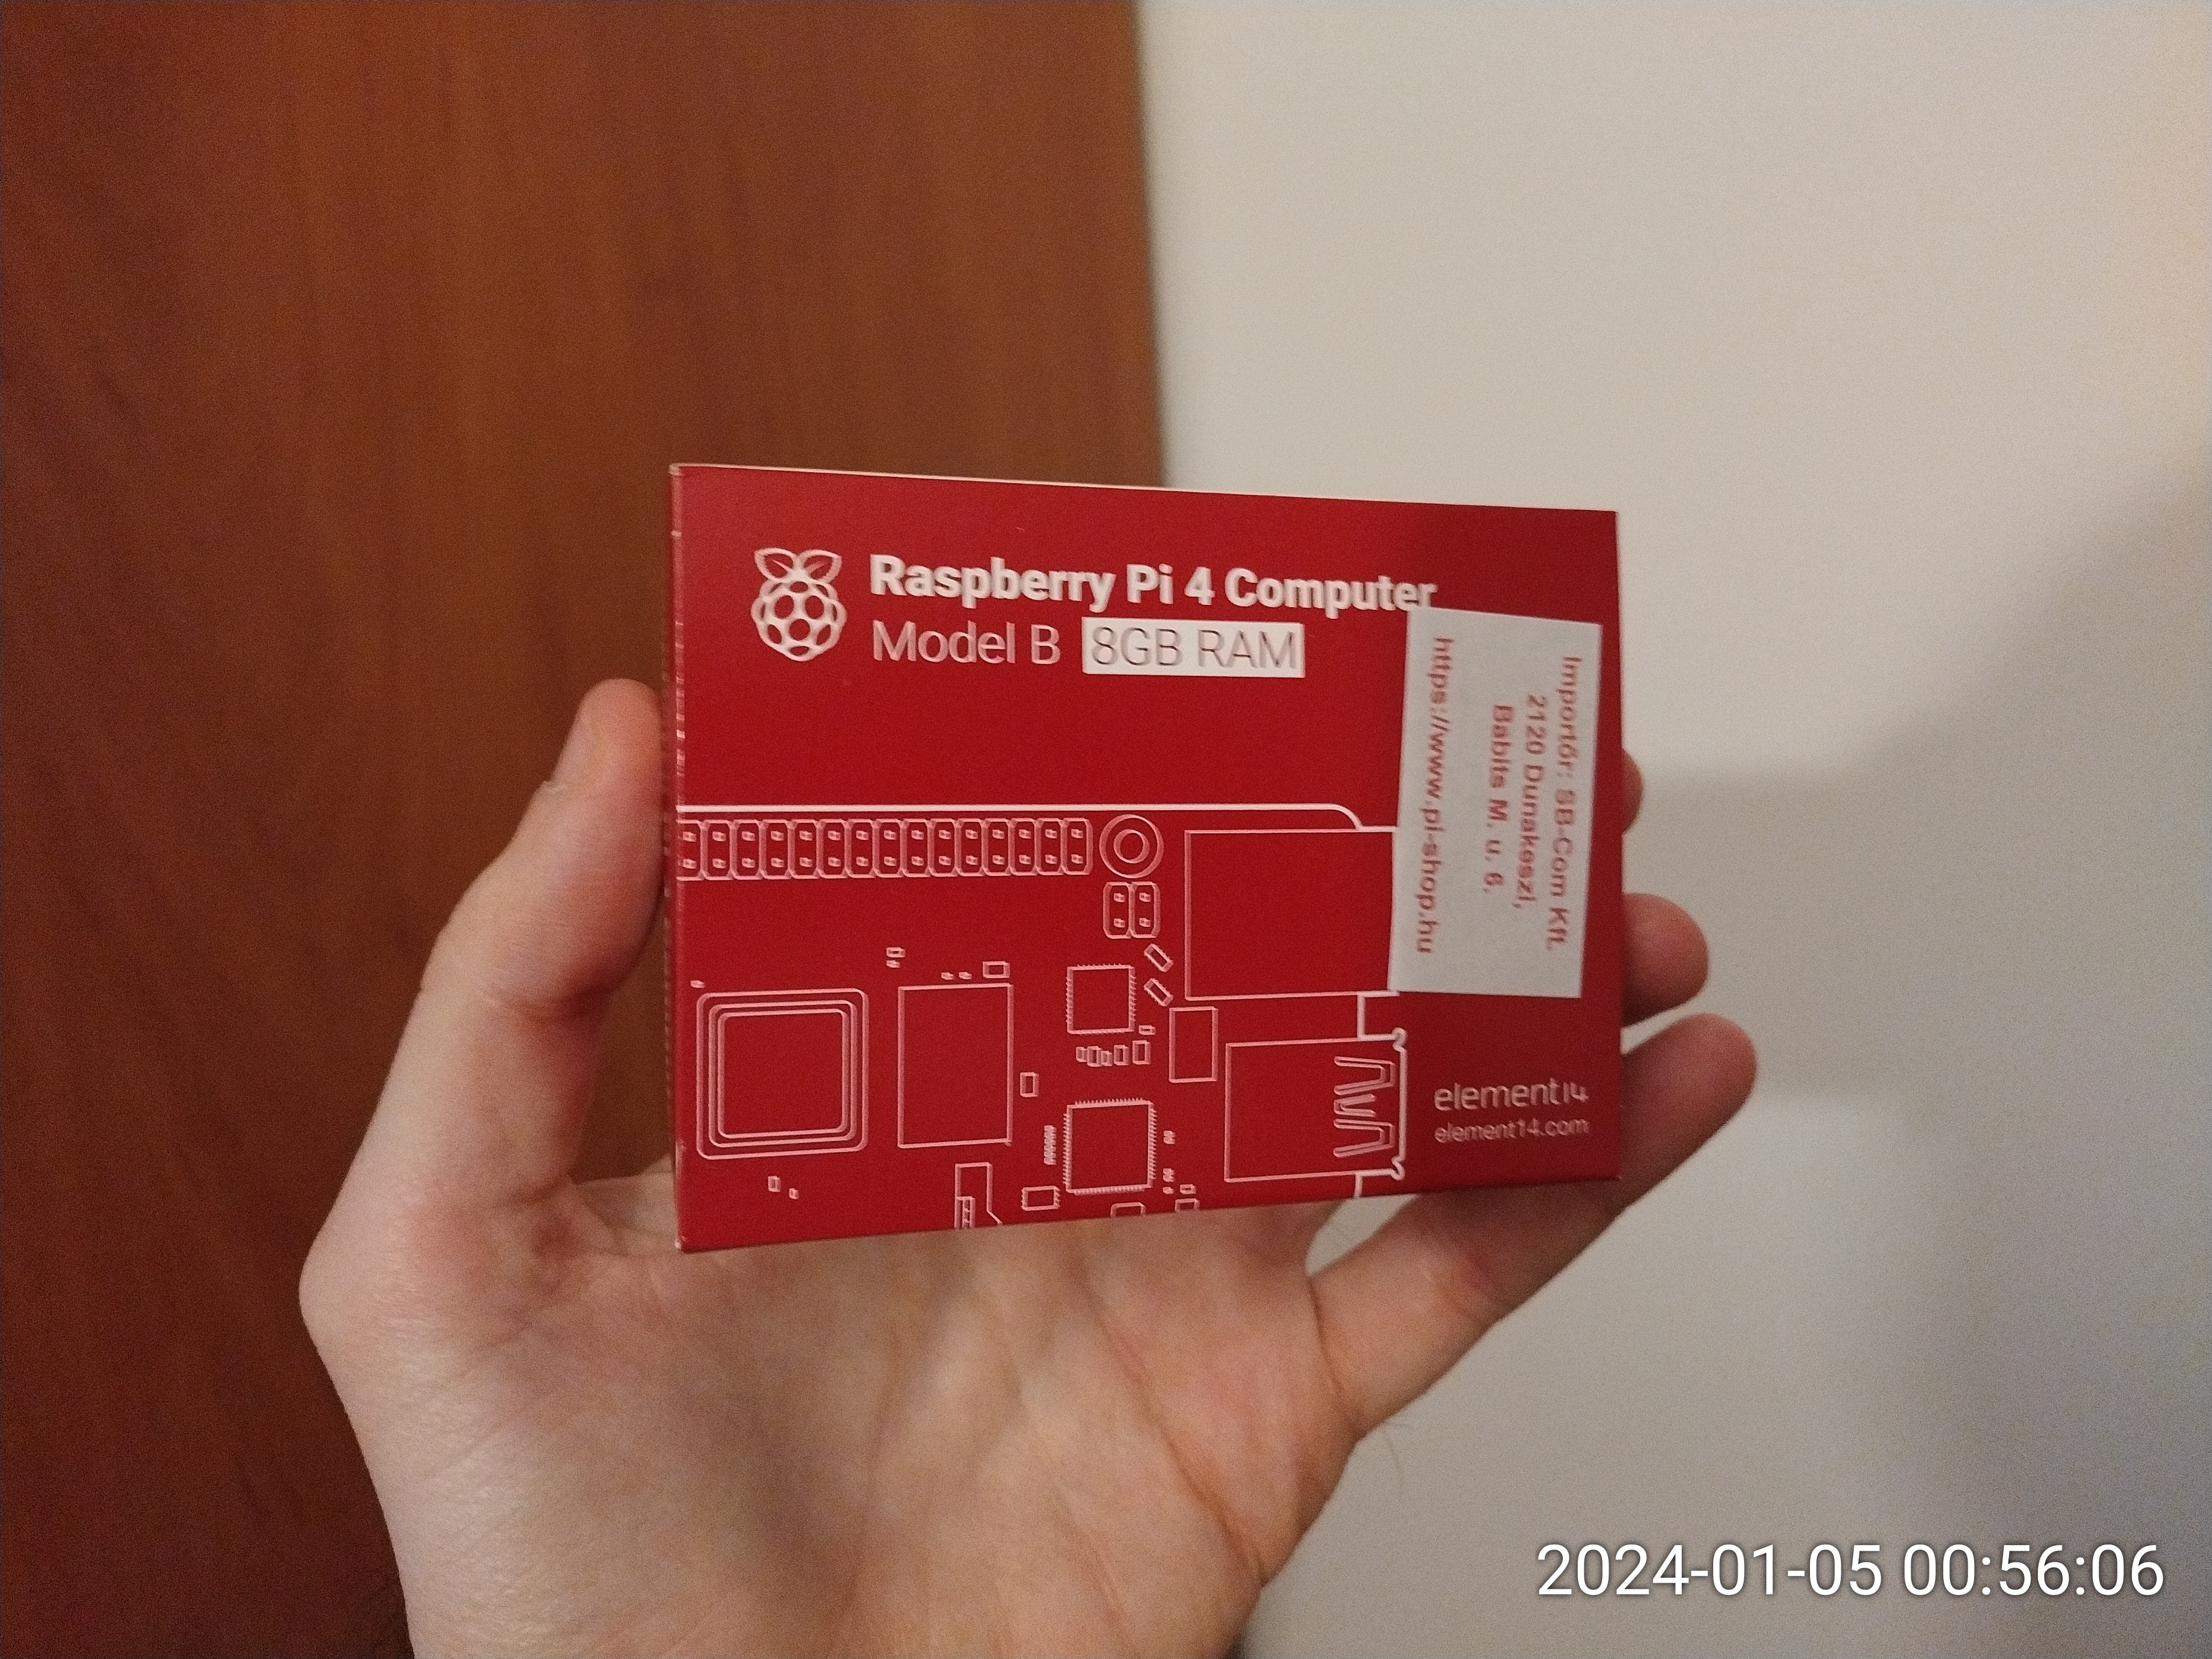
I really wanted to try an ARM based SBC so yesterday I ordered and today got a Raspberry PI 4 model B, with a dual-fan armor case, since I’m definitely going to push it to the limit.
I chose RPI 4 because it’s more mature, has more accessories, and I know that it can run Windows for ARM, which I’d like to try on it.


I think it looks cool in this case.
More importantly I’ve already installed DietPi on it.

From the installation I can already see that it’s faster than the RISC V devices I’ve tried, but I can’t wait to see how it performs during load (while building and then running Arcemu for example).
Arcemu now has initial support for aarch64/ARM64 on Windows
In an earlier post I’ve described a way to set up Windows 10 for ARM64 in an emulated system with QEMU.
The entire point of that exercise (other than curiousity of course) is to make Arcemu build for, and run on that platform.
So now I am happy to report that finally Arcemu builds on Windows 10 for ARM64, and that you can get into the game world.

Building instructions
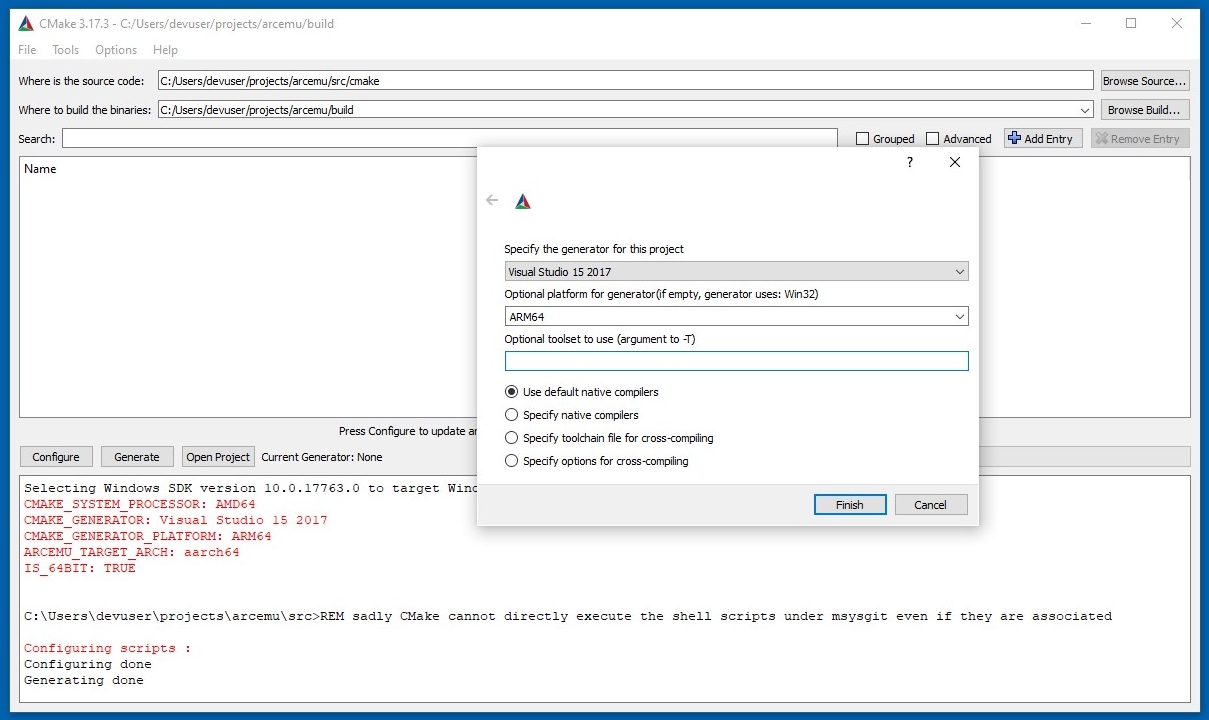
Note: The process is only tested with cross-building from amd64 to ARM64 with Visual Studio 2017. This means that you build for arm on a Windows for x86/amd64, then you have to copy the built files to the Windows for ARM machine.
Here are the instructions:
- Install the ARM64 compiler, libraries, and Windows SDK in the Visual Studio 2017 installer
- In CMake set the “Optional platform for generator” to ARM64
- Configure and Generate
- Open the generated solution then build and install
- Copy the files to the ARM machine and run there


Arcemu now has initial ARM64/aarch64 support on Linux
In previous posts I described how to set up and run emulated ARM64/aarch64 system environments to run ARM64/aarch64 OSes.
The point of setting up Linux aarch64 environment was to make Arcemu build and run on that platform.
I am happy to report that now it does in this virtual aarch64 Ubuntu 22.04 environment.
As soon as I get my hands on a real device (soon) I will verify this on that too.
Until then here’s a screenshot:

Windows 10 for ARM with QEMU for Windows
In the previous post I described the steps of emulating an ARM64/aarch64 system with QEMU in order to boot the ARM version of Ubuntu 22.04.
I also wanted to try Windows for ARM so that I can examine how I can build software for it.
While it is not that widespread yet, with recent developments regarding the ARM platform (ARM based Apple devices, Qualcomm attacking the PC market) it is clearly a platform that is worth exploring.
Fortunately with QEMU we can create a virtual environment that Windows for ARM is willing to run on.
I picked Windows 10 over Windows 11 for the following reasons:
- I hoped there would be more experience with it already, and more documentation, which would increase my chances for success
- Older OS usually means less HW requirements, which is quite helpful with performance when emulating another system
- While supporting only the latest and greatest version of an OS has it’s advantages it does mean less users
I read the following posts before and during my attempt:
- https://github.com/raspiduino/waq
- https://kitsunemimi.pw/notes/posts/running-windows-10-for-arm64-in-a-qemu-virtual-machine.html
- https://winaero.com/install-windows-10-arm-qemu/
- https://www.withinrafael.com/2018/02/12/boot-arm64-builds-of-windows-10-in-qemu/
Unfortunately none of them were sufficient enough for me to be successful.
That’s why I decided to write up this post describing my experience, and providing a step by step guide.
Do note that this guide is for Windows.
Preparation
- Create a working directory for your Windows for ARM environment. I my case it’s L:\projects\win10arm
- Download Windows 10 for ARM install disk to your working directory
- Download and install QEMU for 64bit x86
- Download the stable VirtIO drivers to your working directory
- Download QEMU_EFI.img and QEMU_VARS.img files from here, and copy them to your working directory.
The UEFI BIOS found on that link was modified and compiled by Rafael Rivera.
The modifications include re-enabled VGA virtual display support, and a modified Windows loading screen logo.
Create a virtual harddrive
- Right click the start menu and click Disk Manager
- Click Actions and then Create VHD
- Set up parameters as such: 60 GB size, VHDX, Fixed size and then click OK.
- Right click on the new disk (Disk 3 on my picture) and select Initialize Disk
- Select GPT and then click OK.
- When it finished right click again, and now select detach VHD.


Note: Fixed size is important, because otherwise the emulated environment will only see the initial size which is just a few MBs.
The QEMU startup batch file
- Create a new batch file in your working directory with the name start.bat and the following contents:
@echo off
L:\qemu\qemu-system-aarch64.exe ^
-M virt,virtualization=true ^
-accel tcg,thread=multi ^
-cpu cortex-a57 ^
-smp 4 ^
-m 4G ^
-pflash QEMU_EFI.img -pflash QEMU_VARS.img ^
-device VGA ^
-device nec-usb-xhci ^
-device usb-kbd ^
-device usb-mouse ^
-nic user,model=virtio ^
-device virtio-blk,drive=system ^
-drive if=none,id=system,format=raw,file=.\sys.vhdx ^
-device usb-storage,drive=drivers ^
-drive if=none,id=drivers,readonly=on,format=raw,media=cdrom,file=.\virtio-win-0.1.240.iso ^
-device usb-storage,drive=install ^
-drive if=none,id=install,format=raw,media=cdrom,file=.\win10arm.iso
Obviously you should change the paths to your own.
Let’s see what these parameters mean:
-M virt,virtualization=trueWe’re starting a generic virtual machine which means it’s not an emulation of any real hardware, with “Arm Virtualization Extensions” enabled.-accel tcg,thread=multiUse one host CPU thread / emulated guest thread-cpu cortex-a57We’re emulating a cortex-a57 CPU-smp 4Use 4 virtual CPUs-m 4GUse 4 GB of RAM-pflash QEMU_EFI.imgUse the BIOS code in QEMU_EFI.img-pflash QEMU_VARS.imgUse QEMU_VARS.img to store the UEFI BIOS settings-device VGAUse a virtual VGA device for output-device nec-usb-xhciUse a virtual USB controller-device usb-kbdVirtual USB keyboard-device usb-mouseVirtual USB mouse-nic user,model=virtioUse a user mode virtual network interface-device virtio-blk,drive=system -drive if=none,id=system,format=raw,file=.\sys.vhdxThis is the system drive where Windows will be installed to and run from-device usb-storage,drive=drivers -drive if=none,id=drivers,readonly=on,format=raw,media=cdrom,file=.\virtio-win-0.1.240.isoThis is the virtio driver CD-ROM-device usb-storage,drive=install -drive if=none,id=install,format=raw,media=cdrom,file=.\win10arm.isoThis is the Windows 10 for ARM installer DVD
Note: The virtualization extension is an absolute must. Without it I couldn’t even boot the installer, and took me a while to find the reason.
Installation
The installation itself is the same as it would be on an x86 system (select options, next, next), so I will focus on the differences.
Also do note that even the installation is going to be quite slow. It can take hours.
You can start the emulated system with start.bat
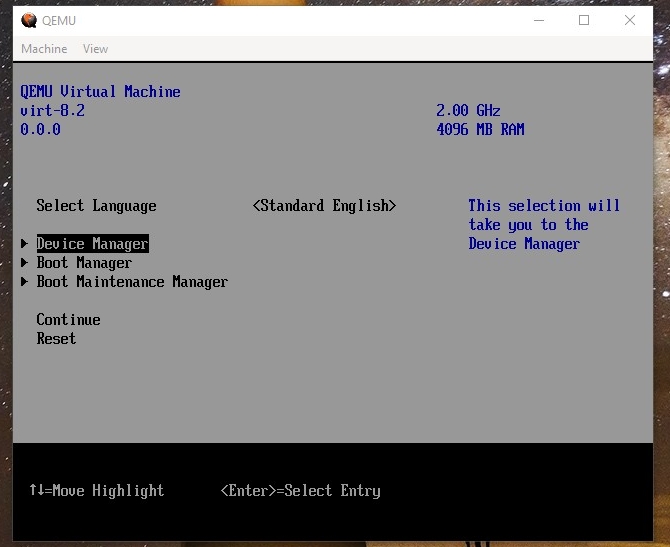
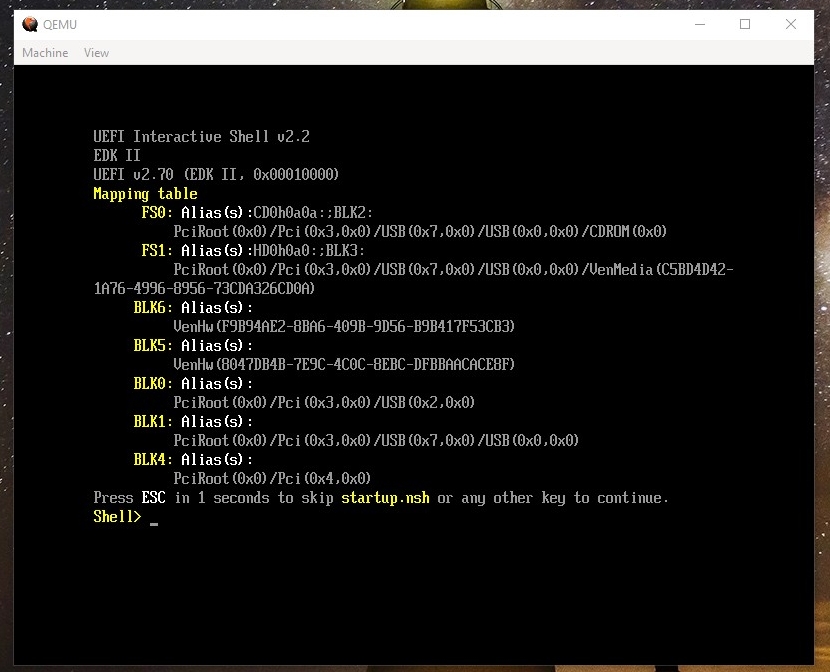
After starting up, the machine will try to boot and fail, so it will ask you to tell it the device it should boot from. It presents you the UEFI shell where you should type ‘exit’ which will make it enter the character based GUI. There you must select the Boot Manager menu item, then select the boot device. In my case it was the one you see on the screenshot: an UEFI QEMU USB HARDDRIVE which is actually the Windows 10 for ARM installation DVD.


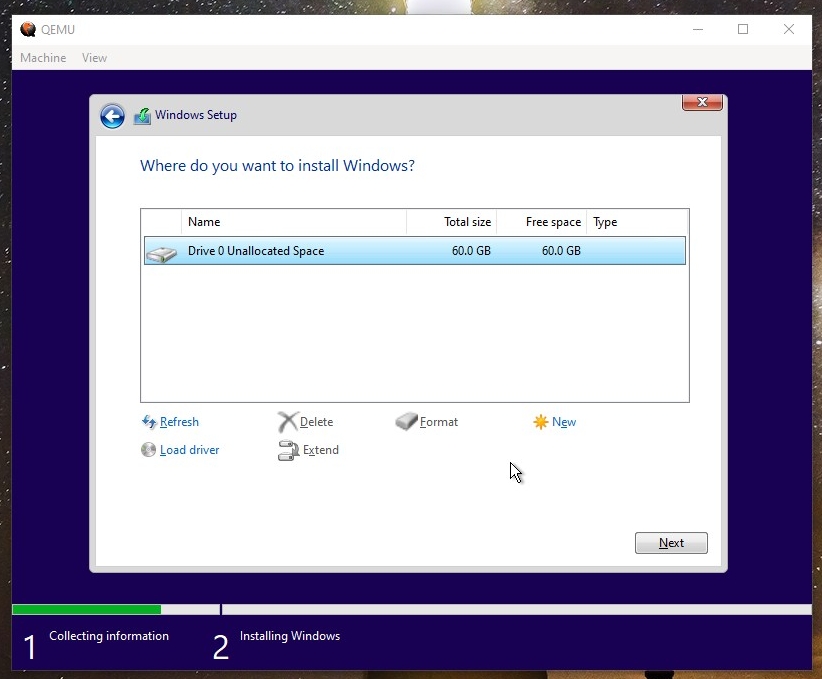
On the “Where do you want to install Windows” screen you will see no hard drives at first, because the Windows installer doesn’t have drivers for the virtualized hard drive. You can fix this by installing the virtio driver you downloaded earlier.
- Click Load driver
- Select the virtio-win CD drive
- Select the viostor/w10/ARM64 directory and click OK
- The installer will show you that it found the Red Hat Virtio SCSI controller driver. Click next
- The installer will install this driver and then the virtual hard drive will finally show up


Sometimes the installer will show you yellow error messages like “OOBKEYBOARD”. You can safely click on the skip button.

You need to skip the Internet setup because the Installer doesn’t have drivers for the virtual network adapter. It will have to be set up after installation.


After the install process finishes you will get a familiar Windows 10 desktop, it’s just running in an emulated ARM64 environment

Post install
Performance improvements
- Turn off / postpone updates
- Open Task Manager and end the Microsoft OneDrive setup
- On the startup tab of Task Manager disable Microsoft OneDrive Setup
- Turn off Microsoft Compatibility Telemetry with the following commands:
sc stop "DiagTrack"
sc config "DiagTrack" start=disabled- Turn off Printer Spooler with the following commands:
sc stop "Spooler"
sc config "Spooler" start=disabled- Turn off search indexing with the following commands:
sc stop "WSearch"
sc config "WSearch" start=disabled
Installing the network driver
- Go to Device Manager through Control Panel (it doesn’t open from the start menu directly for some reason).
- Click on Ethernet Controller in the Other devices category
- Right click, and click on properties
- Click on Update Driver
- click on Browse my computer for drivers
- Click browse and select the virtio-win CD-ROM and select the NetKVM\w10\ARM64 folder
- Click next


Changing display resolution
- Enter the UEFI BIOS menu
- Go to Device Manager -> OVMF Platform Configuration
- Change the resolution in the Change Preferred option
- Select Commit Changes and Exit, then hit enter
- Reboot